Building a CI-CD pipeline on Azure Kubernetes Service (AKS) — Part 2
This Part2 of a 3-part series on how to build a CI-CD pipeline using Azure DevOps, Azure Container Registry Service (ACR) and Azure Kubernetes Service (AKS).
Part 1 : Setup and building the docker image
Part 2 : Creating the build Pipeline in Azure Dev Ops (<- you are here)
Part 3 : Creating a release and Continuous Deployment

In this part we are going to focus on building our Build and Release environment from Azure Dev Ops, previously known as Visual Studio team services.
Yes, I know what you are thinking : why should I use “Visual Studio services” when I want to build a linux based docker image using open source tools such as GitHub, Docker, Jenkins , etc.
Well the reason is that this is exactly what Azure- Dev Ops excel at.
The revolution that Microsoft is ongoing in recent years regarding open-source technologies is quite remarkable and it is no longer “windows-based” tools and languages any more. so basically you can build anything with it.
- Create new Azure Dev Ops Project
Start by creating an AzureDev Ops project here ( I will skip the registration part to the service , assuming you have Azure Credentials , it can be used for both services).

make sure to select Git as the version control.
On the next screen , ignore the clone options since we are not using this project as source control, but rather as a pipeline tool.
Expand the “build code from an external repository” and click “Set Up Build”

On the next screen, select GitHub as the source for the build. you will need to authorise Azure Dev Ops to access your github account, which is a simple matter of oAuth token exchange done for you after you grant the access.
(you can later on view the authorization in your github account)

(be nice and give your connection a nice name where you later on manages all of those external services easily).
after your connection is set up a list of your git hub repositories will be displayed and you will need to select the repository and its branch .
it is usually a good practice to create a “dev” branch which from which all other feature branches will be derived and merged to, and than after a successful merge, we could trigger the auto-build (hence creating a “Continuous Integration). for this demo I have used the master branch from the same source code we have created in the previous blog :

Next, Select the Docker container from a list of templates. Recall we have created the Dockerfile that will initiate our docker build for this repository.

2. Define build tasks
Azure has kindly created for us an “Agent job” that has two tasks in it :
- Build an image : which will be the docker build command
- Push an image: where we could target the docker image into our Azure Container Registry (ACR) we have created in the last section.
You can use however any Container Registry you wish.

Lets start with the right side of that screen. as you can see you are getting an agent from a pool of pre-defined agent pools.
I have selected Hosted-Linux since this is a linux image, but other options in that pool includes even windows container if this is your flavour.
A note about pre-defined Hosted Machines: As you know when you build and use docker images is the smart use of Docker cache layers.
in other words for smaller modifications to your code “layer” will not re-fetch the entire docker layers that were not changed. This saves huge amount of time and network usage when re-building docker images constantly.
With pre-defined Hosted Agents you are not benefiting from this feature since Azure will provision a new host machine for you each time you build, hence will need to re-fetch the entire layers ,including the base layer.
So the build could be 30–40 seconds long.
A fix for that is to use private and dedicated host, but I will not cover this now.
Moving on to the “Build an Image” task, start filling in the form on the right hand side. the information should contain your Azure Subscription ( +Authorise if needed) and the name of the Registry you have created previously ( myCR001 in my case).
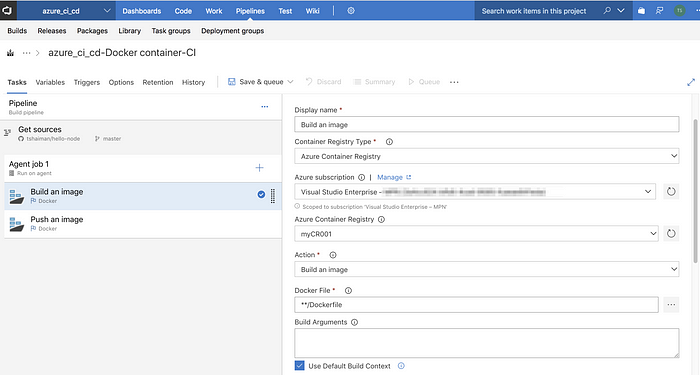
also include the Latest tag by selecting the corresponding checkbox:

Moving on to the next task , Push an image ,its basically identical, fill in the ACR credentials and press the Queue button to start your first Build !

On the left top part of your screen you will get notification about the build being created with a link to the build itself. click it and move on to the build details

as mentioned , this will take some time (approx 40 seconds) . you might get an azure email notification about the build status (as a developer I used to put these emails under dedicated folder with a rule…. )

so each time we build the agent will pull all the image layers since its a brand new host machine we are building upon.
Note: We are still doing manual builds here, soon we will configure a trigger that will span the build upon any change to the “master” branch or any successful merge.
3. Enabling Continuous Integration with GitHub
Once the build has finished we can examine the final output by going to the Azure container Registry using the Azure Portal and see its statistics and tags.

note that each build creates an incrementing build tag and the latest as well since we have marked that option.
Last thing left to do is to enable the Continuous Integration with git hub.
back in the Azure Dev Ops portal, goto the triggers tab, and enable this option both under “Continuous Integration” and under “Pull Requests” menus :

Now for the fun part : Edit your code , change something small like the Welcome message .
if you are in the master branch , commit and push your changes
if not you can merge the changes to the master branch or to any branch you have designated as the target trigger .

Sit back, have a drink, and watch your Code being build , dockerize and pushed to the Docker Registry.
On our next Blog post we will continue with Continuous Delivery to our Kubernetes cluster .
Stay Tuned